PayPal Canva integration is now one of the most powerful ways for creators, coaches, freelancers and small business owners to start getting paid directly through their designs without needing a developer, a hosting plan, or any complicated technical setup. Whether you want to embed a payment link into a digital presentation, add a QR code to a printed flyer, or build a complete online store inside Canva, PayPal makes the entire checkout process travel with your design. This guide walks you through every method available in 2026 so you can choose the one that fits exactly what you are selling and how you want to sell it.
What PayPal Canva Integration Actually Means for Creators

Before diving into the steps it is worth understanding what this integration actually unlocks for you as a creator or business owner.
Your Canva design can do more than look good — it can help you make money. The moment you receive a payment from a stranger something shifts. You start thinking differently about your pricing, your time, and your next offer. It is not just about the transaction. It is a signal to yourself that this is real. You might be surprised how fast something you do on the side becomes a genuine business.
With PayPal Canva integration you do not need hosting, you do not need a developer, and you do not need anyone to approve you. You create your design, connect your PayPal business account, embed your payment link, and share it with the world. Your Canva design and a PayPal account — that is genuinely all you need to open for business.
If you are new to Canva and want to understand the full platform before setting up payments read our guide on What is Canva and What Does It Do first.
What You Need Before You Start
Before setting up PayPal Canva integration there are two non-negotiable requirements.
First you need a Canva account. A free account works for most of what is covered in this guide though a Canva Pro account gives you access to more templates, elements, and media. Second you need a PayPal business account not a personal account. A personal account will not work for accepting payments through Canva. If you currently have a personal PayPal account you can switch it to a business account directly inside your PayPal settings at no cost.
Method 1 — The PayPal Payment Links App Inside Canva
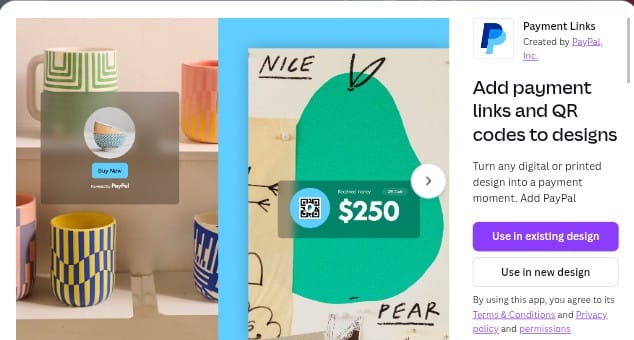
The simplest and most direct method for PayPal Canva integration is using the PayPal Payment Links app that lives directly inside Canva’s apps section.
Setting up the PayPal Payment Links app
Open your Canva design and head over to apps. Search for PayPal payment links. If you are opening it for the first time you will be prompted to connect your PayPal business account — you can log in or create one directly from this screen.
Once you are connected you will see two tabs — create and manage. Start on the create tab.
Creating your product
Give your product a name, set your price and currency, and add an item description if you want one. For a simple service or digital product that is genuinely all you need. If you are selling physical products you can add variants such as size and colour, or include shipping options. Once you are happy click build to complete the creation of your payment link.
Embedding the payment link into your design
After building your product you will be taken to the manage tab which shows you the link you just created. From here you have three options for embedding it into your design.
The first option is a text link. You type your display text, hit embed, and it drops directly into your design as a clickable link.
The second option is a button. This creates a visual button element inside your design that customers can click to go straight to checkout.
The third option is a QR code. This is particularly powerful for anything you intend to print or post physically.
Sharing your design with the payment embedded
Once your design is ready head to the share button. You can download it as a PDF, share it as a website, or create a public view link. When a customer clicks the button or link inside your design they are taken to a PayPal checkout page to complete their purchase. The checkout travels with the design — you send the presentation, they click the button, you get paid.
Method 2 — Using a QR Code for Printed and Physical Designs
The best time to make a sale is the moment someone is standing right in front of your work. A QR code means they can go from seeing something they love to completing a purchase before they walk away.
This method works for flyers, Instagram posts, table tents, posters in your window, business cards, or any printed material. If someone can point a phone at it they can pay.
Setting up the QR code
Open the PayPal Payment Links app inside Canva and click the manage tab. Any product you have already set up appears here — you do not need to create it twice. Open your product and choose the QR code option. Hit embed and it drops straight into your design. You can resize it, reposition it, and make it fit your layout exactly.
When someone scans the QR code they are taken straight to a PayPal checkout page where they can pay with PayPal, PayPal Pay Later, Venmo, or a card.
If you can design it in Canva you can accept payments through it. The QR code makes that true for anything physical you create.
Method 3 — Building a Full Online Store in Canva with PayPal
For creators and small businesses who want a complete storefront the PayPal Canva integration goes much further than a single payment link. You can build a full multi-page online store inside Canva and connect it to PayPal to sell both physical and digital products.
Building the store in Canva
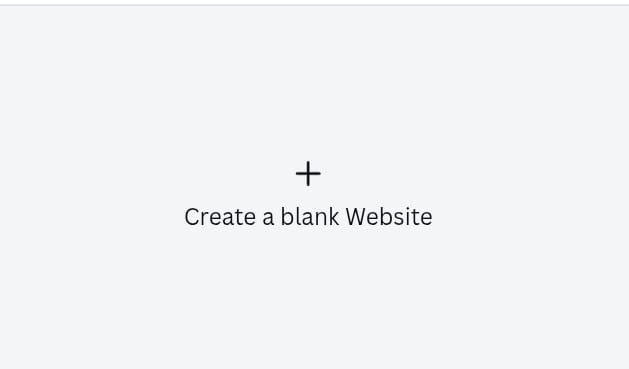
Navigate to website in Canva or click on templates and search for website. You can create a blank website or choose from Canva’s professional website templates. If it is your first time building a website in Canva it is worth choosing a template first to understand how the different elements work together.
For a store that sells multiple types of products you will want multiple pages. A common structure is a homepage, a physical products page, and a digital products page. You can create additional pages by copying your existing sections and pasting them into new pages, then renaming each page to match what it sells.
Once your pages are built you customise each one — replacing template images with your own product images, adjusting text, changing colours and fonts, and adding your logo. Canva’s background remover tool is useful here for cutting product images out of their backgrounds cleanly.
Creating your products in PayPal
Jump over to PayPal.com and sign into your business account. Navigate to pay and get paid, then find PayPal checkout, click get started, and select set up pay links and buttons.
For each product you want to sell add the product name, description, price, currency, and up to five product images. You can enable quantity selection so customers can purchase multiple items at once. For digital products navigate to the confirmation page settings and add a link to where customers can download their purchase — a Google Drive folder set to view only works well for this.
Once you have filled in your product details click build it. Then copy the payment link that PayPal generates.
Linking your products in Canva
Return to your Canva store. Find the product image or element you want to link, right click, select link, paste in the PayPal payment link you just copied, and click done. You can link both images and buttons this way. When a customer clicks that element inside your published store they are taken straight to the PayPal checkout for that specific product.
You can also add cross-sell functionality. Inside PayPal under your product settings find promote related items at checkout and select another product you have created. This lets customers add multiple products to their cart before checking out.
Publishing your store
Once your store is built and all products are linked navigate to publish website inside Canva. Add your site URL, turn on search engine visibility so people can find your store on Google, enable the navigation menu, and add page descriptions for each of your pages. These descriptions help with discoverability online.
Once published your store is live. Copy your URL and share it across your marketing channels.
For writers and creators who want to understand all the free design tools available beyond Canva read our Ultimate Guide to Free Writing Software which covers the best tools for content creation across every platform.
Method 4 — Adding a PayPal Button to Your Canva Website Using a Third Party Tool
If you want to add a standalone PayPal button to an existing Canva website rather than using the built-in PayPal Payment Links app there is a free third party method that works cleanly.
Using Elsite to create the button
Head over to the Elsite platform and navigate to the widget section. Under e-commerce find PayPal button and click on it. Click create a widget for free and you will be taken to a selection of PayPal button templates. Choose the template you prefer — the standard checkout option works well for most use cases.
Before customising make sure you add your business PayPal email address. Then customise your button — you can set the payment type as checkout, donation, or subscription, add your product name, set the price and currency, and adjust the button’s visual style including text, colour, and the PayPal logo display.
Once you are happy click add to website for free. Your widget will be saved and you will be taken to the publish page. Click the green publish button to make your widget live. Elsite offers a free plan that supports one widget for up to 200 views which is enough to get started. Premium plans are available if you need more views or multiple widgets.
After publishing navigate to the share link tab and copy the link for your widget.
Adding the button to Canva
Return to your Canva editor and go to the apps section on the left. Search for embed and click the embed option. Paste the link you copied from Elsite and click add to design. Your PayPal button will appear inside your Canva design ready for customers to use.
Which PayPal Canva Integration Method Should You Use?
The right method depends entirely on what you are creating and how you want to sell.
Use the PayPal Payment Links app if you want the simplest embedded payment solution directly inside a presentation, pricing page, or digital document you send to clients.
Use the QR code method if you are creating anything physical — printed flyers, event materials, product displays, or anything someone will hold in their hands or see on a wall.
Use the full online store method if you want a complete multi-product storefront hosted on a Canva website URL that you can promote across all your channels.
Use the Elsite third party button if you already have a Canva website and want to add a standalone PayPal checkout button to a specific page without rebuilding anything.
All four methods are free to set up. PayPal charges a small transaction fee per payment but there are no upfront costs for any of the integrations described in this guide.
Why PayPal Canva Integration Changes Everything for Creators
The combination of Canva’s design tools and PayPal’s payment infrastructure removes every barrier that used to stand between a creator and their first sale. No hosting costs. No developer fees. No application process. No waiting for approval.
You design something in Canva, connect your PayPal account, embed a payment link, and share it. Someone sees it, clicks it, and pays. That moment — the first notification that a stranger just bought something you made — changes how you think about your work, your pricing, and what is possible next.
Are you a writer or creator ready to share your work and grow your platform? Publish your stories, articles and ideas completely free at inkwrit.com — a platform built for creators just like you.

Author: Bridget Austin
Ifeoma, who writes under the pen name Bridget Austin, is the founder of Inkwrit — a freelance writing platform built for African writers and storytellers. With a background in copywriting and content strategy, she created Inkwrit to give African voices a professional home to publish, build portfolios, and grow their writing careers. When she's not building the Inkwrit community, she writes about freelance writing, African literature, and the business of creative work.