How to Remove Background in Canva — And Replace It With Anything You Want
Learning how to remove background in Canva is one of those skills that completely changes what you can create. What used to take professional designers hours of careful manual work now takes Canva’s AI less than five seconds — and the results are genuinely impressive. This complete 2026 guide walks you through the full process from removing your original background to replacing it with exactly what you want so your designs look clean, creative and professional every single time.
What You Need Before You Start
Before you learn how to remove background in Canva there is one important thing to know about plan requirements.
The background removal feature in Canva is primarily a paid plan feature. The BG Remover tool with the crown icon next to it requires a Canva Pro subscription or any other paid Canva plan. However if you are on the free plan it may be worth trying the tool once — some free users report being able to use it a limited number of times per day before being prompted to upgrade.
Not sure what Canva is yet? Read our full Canva overview first.
How to Remove Background in Canva Using the BG Remover
This is the fastest and most direct method for removing a background in Canva and the entire process takes less than thirty seconds once you know the steps.
Step 1 — Go to Canva and open a new design
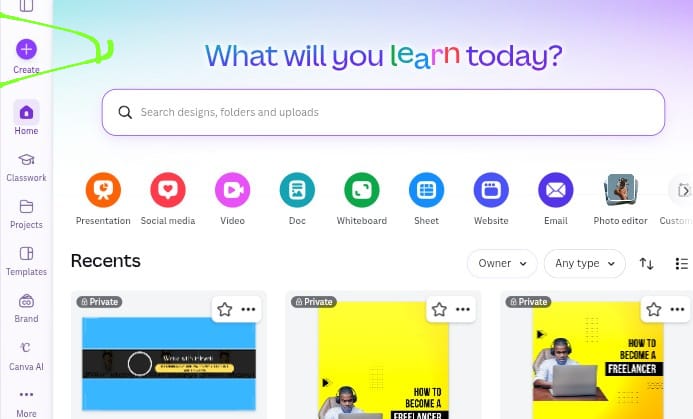
Head to canva.com. On the left hand side click on create and then go to upload. You can either upload your image file directly, upload an entire folder of images, or simply drag and drop your photo onto the upload area. Canva accepts most standard image formats.
One important note on image size — Canva requires your image to be at least 40 pixels and no larger than 8,000 pixels on any side. If your image is larger than 8,000 pixels you will need to resize it before uploading. A custom size of around 500 by 500 pixels works well for testing the feature and you can adjust to whatever dimensions your design requires.
Step 2 — Open your image in the editor
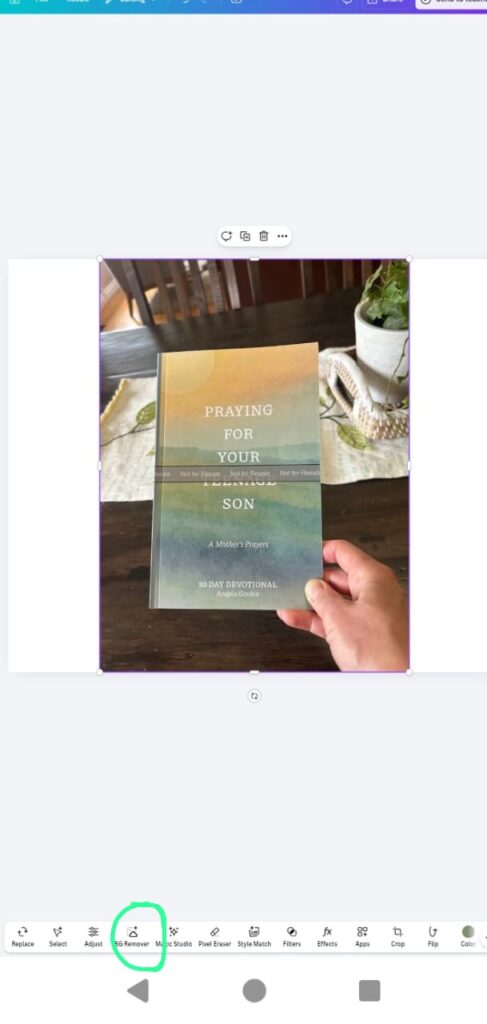
Once your image is uploaded click on it to open it in the Canva editor. When the image is selected you will see a menu appear across the top of the screen with various editing options.
Step 3 — Click BG Remover
In the top menu look for the BG Remover option — you will see a small crown icon next to it indicating it is a paid feature. Click on BG Remover and give Canva a moment to process your image.
The AI works quickly — usually less than five seconds — and when it finishes your background will be completely gone. If you have ever removed a background manually using selection tools you will immediately appreciate how impressive this result is for the time it takes. The AI handles edges, hair, complex shapes and fine details with accuracy that would take significant manual effort to replicate.
Step 4 — Use your image or download it
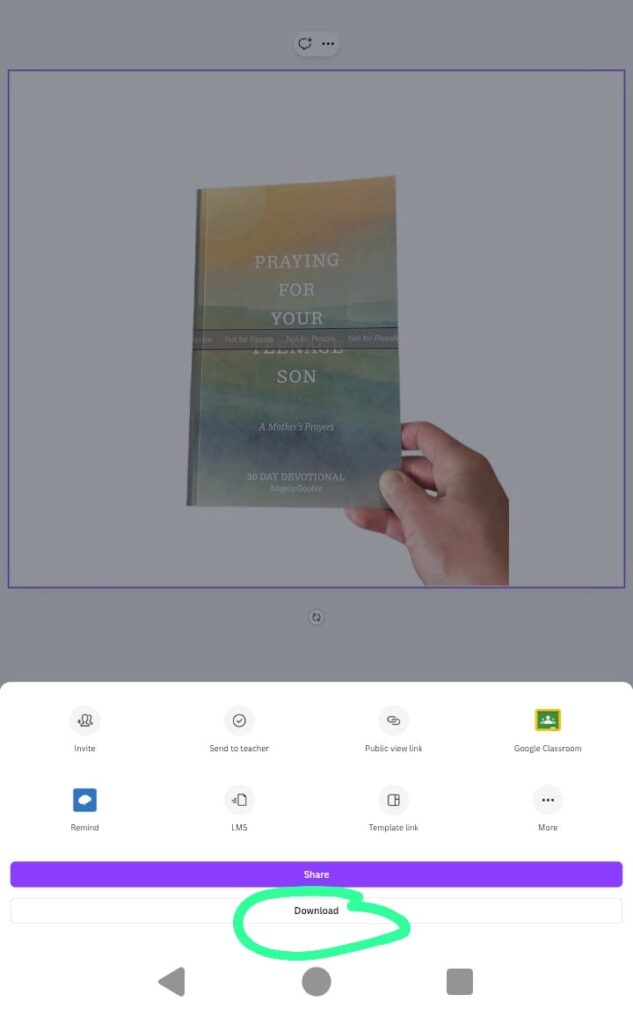
Once the background is removed you have two options.
You can stay inside Canva and continue editing — adding a new background, combining your subject with other design elements, or using it within a larger composition. This is covered in the next section below.
Alternatively you can download the image immediately. Go to share and then download. This is the critical step most people miss — if you want your downloaded image to have a transparent background rather than a white background you must select the transparent background option in the download settings before clicking download. If you skip this step your image will download with a white background behind your subject instead of transparency.
For a full comparison of what Canva Pro includes beyond the background remover read our guide What is Canva and What Does It Do
How to Replace the Background With Something New
Knowing how to remove background in Canva is only half the skill. Replacing it with a new background is where the real creative possibilities open up and Canva makes this process just as straightforward as the removal itself.
Step 1 — Open a blank canvas
Start by opening a blank canvas in Canva. Any size works — just click on create and choose the dimensions that match your design project. Once you have your blank canvas you are ready to bring in your original photo.
Step 2 — Remove the background using the Background Eraser app
For this method go to apps on the left panel of the Canva editor. In the search bar type background eraser. Once you are inside the background eraser app select your photo and Canva will instantly erase the background for you automatically. This works the same way as the BG Remover tool and delivers the same fast clean results.
Step 3 — Add your new background
Now that your subject’s background is gone it is time to add a replacement. You have two options here.
If you have your own background image head over to uploads on the left panel and upload the photo you want to use as the new background behind your subject.
If you do not have a specific background image in mind head to elements on the left panel and search for the kind of background you are looking for. Type in descriptive terms like beach, cafe, aesthetic wall, forest, studio, or anything that matches the mood of your design and browse the results to find something that fits.
Step 4 — Position your background correctly
Once you have added your new background image it will appear on top of your subject by default which is the opposite of what you want. Click on the background image to select it then click on position in the top menu and select send to back. This moves your new background behind your subject so the composition looks correct with your subject in the foreground and the new background sitting naturally behind them.
Step 5 — Make final adjustments
With your subject in the foreground and your new background in place make small tweaks to get everything looking natural. You can adjust the size of either element, add a slight blur to the background to create depth, or add shadows beneath your subject for a more realistic blend between the foreground and background. These small adjustments make a significant difference to how professional and intentional the final result looks.
Quick Recap — How to Remove Background in Canva in 5 Steps
For anyone who wants the process summarised quickly here is the complete method:
Go to canva.com and click create then upload. Select your image or drag and drop it into the upload area. Click on the image in the editor to select it and get the top menu. Click BG Remover and wait less than five seconds for the AI to remove the background. Then either continue editing within Canva or go to share, download, and select transparent background before downloading.
That is the entire process for how to remove background in Canva. From upload to finished result in under a minute.
Tips for Getting the Best Results
A few habits will consistently improve your background removal results in Canva.
Images with clear contrast between your subject and the background give the AI the best chance of producing a clean cut. A person photographed against a plain wall will produce a cleaner result than someone photographed against a busy patterned background.
For product photography against white backgrounds the results are almost always perfect first time with no adjustment needed.
For complex subjects with fine details like hair or fur the AI handles these surprisingly well but checking the edges after removal and making small manual adjustments using the erase and restore tools can clean up any imperfections.
Always download as transparent PNG when you intend to use the removed background image in another design or on a website. The transparent background means your subject will sit cleanly on any colour or background without a white box around it.
What You Can Create Once You Know How to Remove Background in Canva
Understanding how to remove background in Canva opens up a significantly wider range of design possibilities than most beginners realise when they first learn the feature.
Product images for online stores look dramatically more professional when the background is removed and replaced with a clean white or branded background. Social media graphics become more dynamic when subjects are cut out and placed against custom backgrounds that match your brand colours. Book covers, thumbnail images, promotional materials, and digital products all benefit from clean subject isolation that background removal makes possible in seconds.
Combined with Canva’s other design tools — the text options, graphics library, brand kit, and layout templates — the background remover becomes one of the most frequently used features in any serious Canva workflow.
For writers and creators who want to understand all the free and paid design tools available read our Ultimate Guide to Free Writing Software which covers the best creative tools across every platform.
Are you a writer or creator building your platform? Publish your stories, articles and ideas completely free at inkwrit.com — a platform built for creators just like you.

Author: Bridget Austin
Ifeoma, who writes under the pen name Bridget Austin, is the founder of Inkwrit — a freelance writing platform built for African writers and storytellers. With a background in copywriting and content strategy, she created Inkwrit to give African voices a professional home to publish, build portfolios, and grow their writing careers. When she's not building the Inkwrit community, she writes about freelance writing, African literature, and the business of creative work.